A centralized CRM system is essential for seamless communication and efficient operations. However, one common challenge many companies face is managing form submissions from various sources outside their main CRM platform. This can lead to fragmented data, missed opportunities, and a lack of cohesive insights.
Imagine the inconvenience of manually transferring form submissions from multiple platforms into HubSpot CRM, only to realize that valuable data has slipped through the cracks or isn’t updated in real time. This consumes valuable time and resources and hinders the ability to respond promptly to potential leads.
Fortunately, there is a solution to this challenge. Businesses can ensure a unified view of all customer interactions by integrating non-HubSpot form submission data into HubSpot CRM.
This blog will guide you through integrating these non-HubSpot forms into HubSpot CRM so that you can easily manage all your data and enhance your marketing and sales efforts. With this information, you can have a more efficient, streamlined workflow that empowers your team to work smarter, not harder.
What are Non-HubSpot Forms?
| Non-HubSpot forms are simply ones you create outside of HubSpot, often using basic HTML, and place on your website. These forms weren’t built using HubSpot’s tools, but you can still manage their submissions through HubSpot. |
Why Integrate Non-HubSpot Forms into HubSpot CRM?
Integrating non-HubSpot forms into your HubSpot CRM can significantly enhance your marketing and customer management strategies. Here are the main reasons why this integration is beneficial:
- Centralized Data Management: You can keep all your form data in one spot to make analyzing customer interactions easier.
- Streamlined Lead Management: With everything in your CRM, tracking leads and following up becomes simpler, which boosts your conversion rates.
- Improved Efficiency: You can automate data entry to cut down on mistakes and free up your time for bigger things.
- Better Reporting and Insights: It helps you to acheive precise and in-depth analytics to help guide your decisions.
Important Considerations for Managing Non-HubSpot Forms
When integrating non-HubSpot forms with your HubSpot account, there are several important points to keep in mind:
1. Form Limit: Each HubSpot account can handle up to 10,000 non-HubSpot forms.
2. Submission Collection: HubSpot captures every submission attempt made when the submit button is clicked. This means that if a form requires corrections (like filling out a required field that was missed), each attempt, including incomplete ones, is recorded. This could result in multiple entries for a single form submission: one incomplete and one complete.
3. Dependency on Tracking Code: The effectiveness of the non-HubSpot forms tool relies on the proper functioning of the HubSpot tracking code. If the code fails to load, due to JavaScript conflicts or browser security settings, for example, the form submissions may not be captured.
4. Cookie-based Contact Records: HubSpot associates all submissions from the same device and browser to a single contact record using cookies. Even if different submissions use different email addresses, they will be linked to one contact if they are from the same browser and device.
5. Dealing with Limitations: Given these limitations, which are often related to external factors beyond HubSpot’s control, consider involving a developer. They can help by using HubSpot’s API to directly submit data to forms or by setting up another form integration.
These points will help ensure smooth integration and management of non-HubSpot forms in your HubSpot account.
Essential Criteria for Capturing Non-HubSpot Form Submissions
To ensure your non-HubSpot forms successfully integrate with HubSpot, they must adhere to the following simple criteria:
- Form Type: The form should be a basic static HTML form.
- Structure: It must be enclosed within HTML <form> tags.
- Email Field: Include an input field defined by <input type=”email”>.
- Submission Button: Use a standard <input type=”submit”> button to submit the form.
- Frame Restrictions: Do not place the form within an <iframe>.
- JavaScript Free: Avoid using JavaScript for the form’s submit event or on the submit button.
- Loading Requirement: The form should be available on the page from the initial load; forms should be added after the page loads are not captured.
- Single-page App Limitation: Avoid using the form on single-page applications, as these typically do not load HTML in a manner that allows HubSpot to track form submissions.
- Sensitive Information: Ensure the form does not include fields for sensitive data like credit card numbers.
- Hidden Fields: Do not include hidden fields in the form, as HubSpot will not track them.
These guidelines help ensure your form submissions can be successfully collected and managed within your HubSpot account.
How to Pull Non-HubSpot Form Submission Data into HubSpot CRM?
HubSpot is a robust platform offering various marketing and CRM tools. However, suppose your needs or budget limit your use of HubSpot’s all-in-one solutions, and you’re utilizing various tools. In that case, you may still want to integrate form submissions from your website directly into HubSpot CRM. Here are three effective methods to achieve this integration, allowing you to maintain a streamlined workflow without fully committing to HubSpot’s suite of services.
I. Manually Add the HubSpot Tracking Code
To begin capturing data from non-HubSpot forms into your HubSpot CRM, the first method involves manually adding the HubSpot tracking code to your website. This is essential for users of HubSpot Marketing Hub and can be accomplished by following these steps:
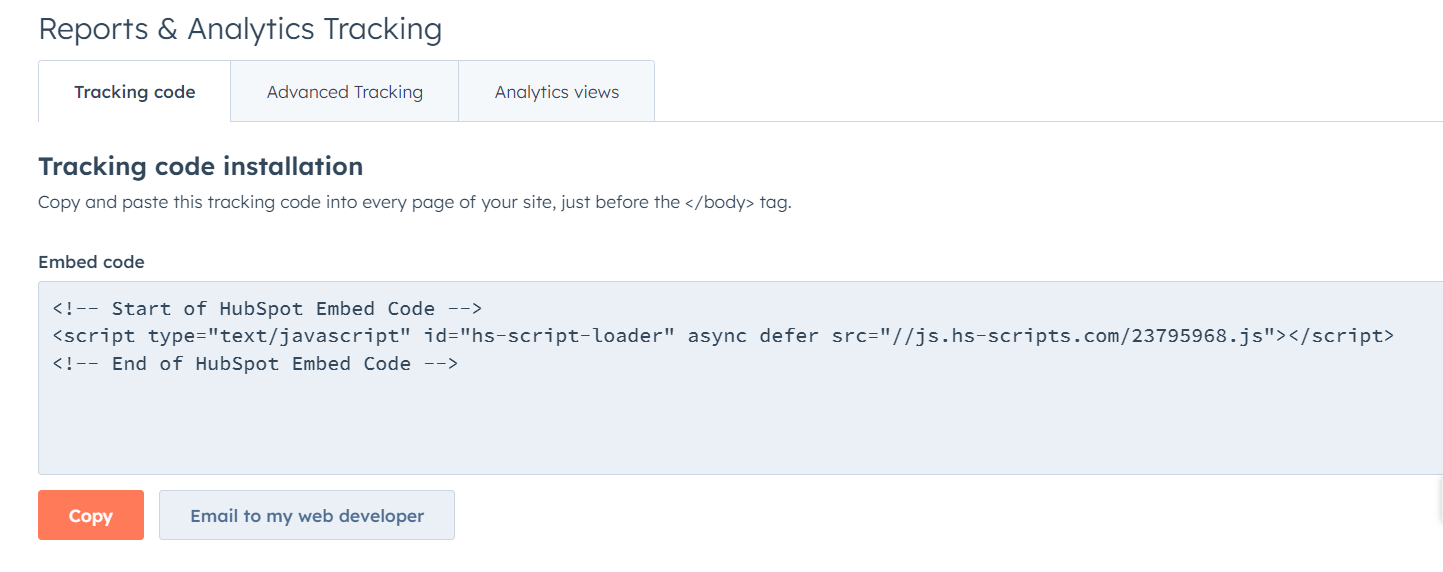
- Access the Tracking Code
Log into your HubSpot account. Depending on your account type, you can access the tracking code by selecting the Settings icon and then choosing Tracking Code under Reports or directly from the settings menu.
- Copy the Tracking Code
Here’s a snippet of JavaScript code provided by HubSpot. This code is designed to be inserted into your website’s HTML. Copy this entire snippet to your clipboard.
- Install the Code on Your Website
The tracking code should be placed in your website’s HTML before the closing </body> tag. This placement ensures the code loads on every page where you must capture form submissions.
Suppose you’re not familiar with HTML or your website’s structure. In that case, it’s advisable to work with a developer or someone with technical expertise to ensure the code is added correctly.
- Specific CMS Instructions
HubSpot provides detailed guides for installing the tracking code on various content management systems (CMS) such as WordPress, Drupal, Magento, Wix, Shopify, and Google Tag Manager. Each CMS has unique steps for adding JavaScript, so refer to the specific instructions for your platform on HubSpot’s help pages.
This first step is crucial as it sets the foundation for HubSpot to detect and collect data from forms on your website, regardless of whether they were created in HubSpot. Once the tracking code is installed and active, HubSpot can capture any form submission on your site, provided the form meets the criteria that HubSpot outlined.
II. Install HubSpot’s WordPress Plugin
For businesses utilizing WordPress as their Content Management System (CMS), integrating non-HubSpot forms into HubSpot CRM can be streamlined through the HubSpot All-In-One Marketing WordPress plugin. This plugin facilitates form submission capture and enhances your WordPress site with a range of marketing tools. Here is how you can install the HubSpot WordPress Plugin:
- Download the Plugin
Source: WordPress
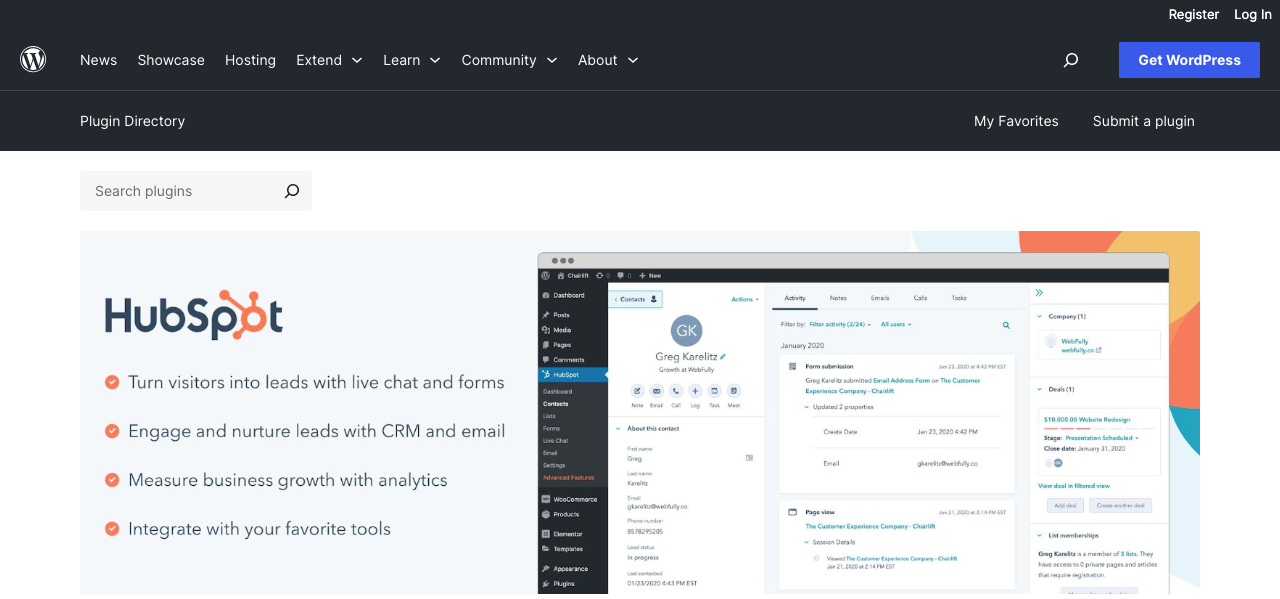
Navigate to your WordPress admin dashboard. Go to Plugins > Add New. In the search bar, type HubSpot All-In-One Marketing - Forms, Popups, Live Chat to find the plugin.
- Install and Activate
Once you find the plugin, click Install Now. After the installation, click Activate to enable the plugin on your WordPress site.
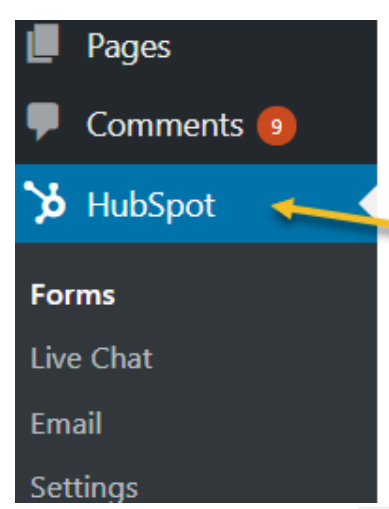
- Setting Up the Plugin
To access HubSpot settings, find and click the HubSpot button in your WordPress administration menu. This will open the plugin’s settings and options.
- Connect Your HubSpot Account
If you already have a HubSpot account, you can connect it by signing in using the prompt provided in the plugin’s settings. If you do not have an account, you can create one during this step.
Here are some of the benefits of the HubSpot WordPress Plugin:
Post-installation, the plugin automatically adds the necessary HubSpot tracking code to your WordPress site. This code is crucial for monitoring interactions on your site, including form submissions.
Beyond tracking, the plugin incorporates several additional features into your WordPress site, such as contact management, email marketing, live chat, and more. These tools are designed to improve your inbound marketing efforts and enhance user engagement.
By following these steps, you can efficiently integrate your WordPress site with HubSpot CRM, leveraging the full capabilities of HubSpot’s marketing tools directly from your existing CMS platform.
III. Utilize a Third-Party Add-On from a Forms Provider
For those using specialized form-building software on their websites, integrating with HubSpot CRM can often be streamlined through third-party add-ons developed by the form providers themselves. This is particularly convenient, as it may not require manual tracking code installation or reliance on HubSpot’s plugins.
- Identify Compatible Add-Ons
Begin by checking if your form provider offers an add-on for HubSpot integration. Providers like Gravity Forms, Typeform, and Wufoo are known to offer such integrations. Visit your form provider’s website or search their marketplace to see if a HubSpot integration is available.
- Install the Add-On
If available, follow the provider’s instructions to install the add-on. This process typically involves downloading and installing the add-on directly within the provider’s form management interface.
- Configure the Integration
Once installed, you’ll likely need to connect the add-on to your HubSpot account by entering your HubSpot credentials or an API key. Configure the settings to specify how data should be transferred to HubSpot. This might include mapping form fields to specific HubSpot contact properties to ensure data consistency.
Here are some of the benefits of using Third-Party Add-Ons
These add-ons are designed specifically for compatibility with the form provider’s software and HubSpot, simplifying the integration process. An add-on bypasses the need to embed tracking codes manually, which can be advantageous if you prefer a less technical setup. Many add-ons offer customizable options that allow you to control how and when data is sent to HubSpot, providing flexibility in managing data flow.
By considering these factors and choosing the appropriate integration method, you can effectively manage form submissions within HubSpot, enhancing your data management and customer interaction capabilities.
Setting Up HubSpot to Capture Data from Non-HubSpot Forms
To ensure your non-HubSpot forms are properly integrated and their data captured within your HubSpot CRM, follow these steps to enable and configure the necessary settings in HubSpot:
Enabling Non-HubSpot Forms in HubSpot:
- Access Settings
Log into your HubSpot account. Click on the Settings icon, usually located in the top right corner of the dashboard.
- Navigate to Forms Settings
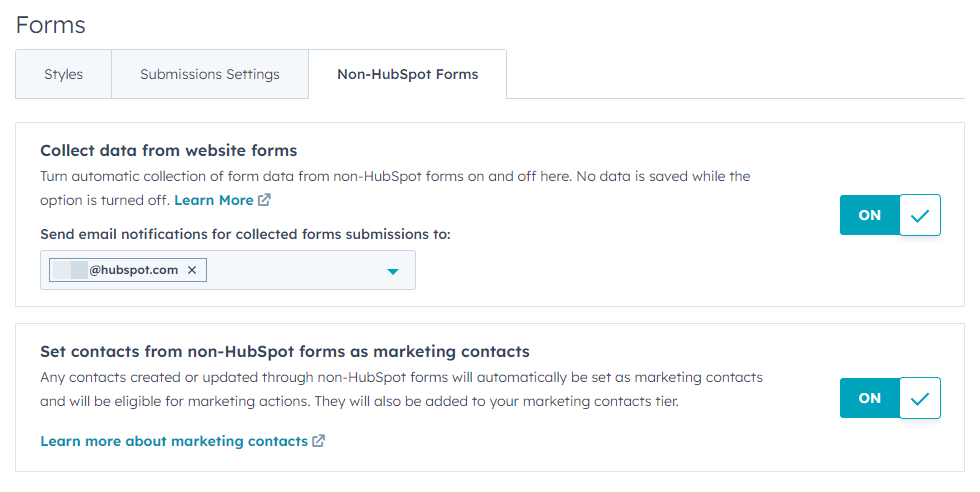
Source: HubSpot
In the left-side menu, click on Marketing, then select Forms. Look for the Non-HubSpot Forms tab and click on it.
- Activate Data Collection
Ensure the option Collect data from website forms is toggled to ON. This setting allows HubSpot to start capturing submissions from forms not created directly within HubSpot.
- Configuring Form Field Mapping
When a form is submitted, HubSpot attempts to map the submitted data to existing contact properties in your CRM. To facilitate accurate data mapping and collection, ensuring that your form fields are named similarly to HubSpot’s default contact properties is important. If the form fields do not match any existing properties in HubSpot, the data from those fields will not be captured.
- Adding Custom Contact Properties
If your forms contain unique fields that do not have corresponding properties in HubSpot, you can create custom contact properties. Return to the Settings menu, select Properties under the left-side menu, and then navigate to the Contact Properties tab. Here, you can add new properties that match your form fields’ names and data types.
Important Tip:
Please note that only single-line text fields are supported for automatic data capture. Other field types, such as multi-line text areas, drop-down menus, etc., are incompatible, and their data will not be collected.
Following these steps, you can efficiently integrate and manage data from non-HubSpot forms, ensuring all submissions are captured and stored within your HubSpot CRM. This setup helps keep your data organized and enhances your ability to effectively manage leads and customer interactions.
If you are interested in learning more about the intricacies of HubSpot CRM and how to streamline complex data processes, read our detailed blog on the HubSpot Data Model.
INSIDEA
Ready to get more out of HubSpot?
We are an Elite HubSpot Partner rated 4.99 across 450+ verified reviews. Let's make your portal work harder.